Crochet Connect Yarn
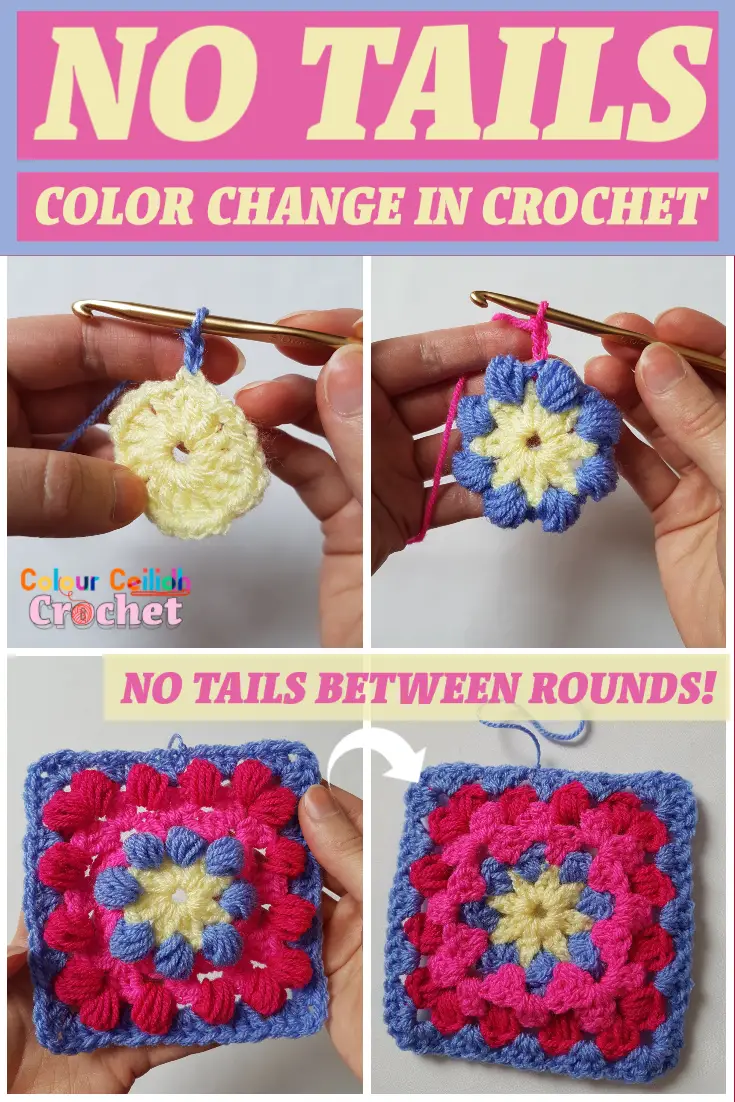
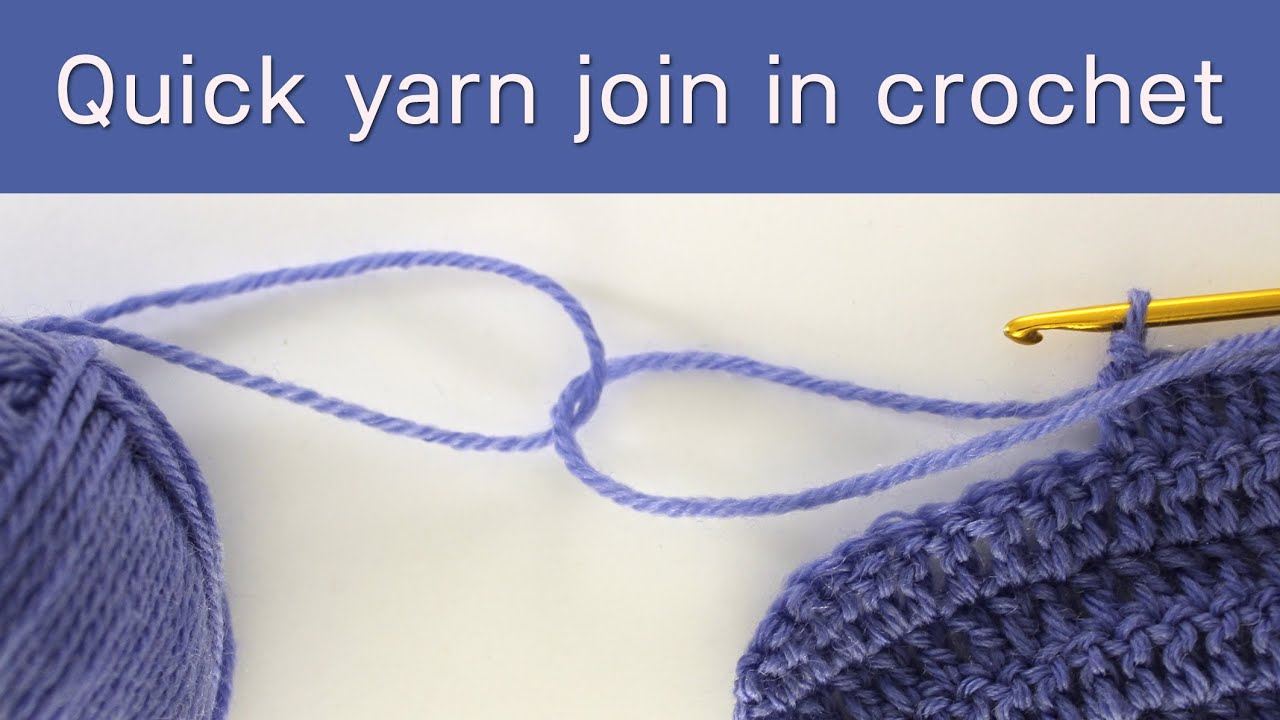
Crochet Connect Yarn - Web easy ways to connect a new skein of yarn to your project joining yarn in crochet is an essential skill to know, especially when you're running out of yarn or switching to a new color. Patterns may have different instructions, so you will want to make sure you understand how the pattern wants you to join. When joining in new yarn or changing color, continue in the working yarn until two loops of the last stitch remain in the working yarn or color. Here's one way to do it. Joining yarn with the last yarn over of a stitch is also especially good if you’re changing yarn colors, like in tapestry crochet and some methods of fair isle crochet. If you’re working on a larger project, say a blanket, an article of clothing, or a big, warm scarf, you’re going to need more than one ball of yarn to complete the project. You want to do this easily and securely. Whether you want to create stripes, patterns or gradients, we'll show you how to switch yarns seamlessly and neatly in your crochet projects. Web easy tutorial on how to join new yarn in crochet. First, you’ll crochet until you come to the end of your yarn. Showing how to join yarns using double crochets but works. You just grab your new yarn and seamlessly continue crocheting. If you’re working on a larger project, say a blanket, an article of clothing, or a big, warm scarf, you’re going to need more than one ball of yarn to complete the project. No need to use a needle to weave in yarn ends. Making larger projects like sweaters and blankets will sure require you to join new yarn into your crochet project. Tug on the dropped end of the old yarn at the base of the double crochet to tighten up the stitch. But how do you transition from one skein to another? If you’re working on a larger project like a blanket or a sweater, you’re going to need more than one ball of yarn to complete the project. Web this is the easiest, quickest way to join yarn in crochet. The pattern page provides detailed photo instructions for. First, you’ll crochet until you come to the end of your yarn. Put a slip knot on the larger hook, and join yarn to the side of the top vertically to the underarm. If you’re working on a larger project, say a blanket, an article of clothing, or a big, warm scarf, you’re going to need more than one ball. Web easy ways to connect a new skein of yarn to your project joining yarn in crochet is an essential skill to know, especially when you're running out of yarn or switching to a new color. The knot join is the simplest method but may leave an unattractive bump on the work. I had about 8″ here, give or take.. Learn this great way to join yarn in knitting or crochet. Crochet projects often require joining yarns together. Here are some helpful tips for making the crochet magic knot: Making larger projects like sweaters and blankets will sure require you to join new yarn into your crochet project. When joining in new yarn or changing color, continue in the working. Web how to join or change yarn in the middle of the row. If you have any requests for these, leave them in the. Whether you want to create stripes, patterns or gradients, we'll show you how to switch yarns seamlessly and neatly in your crochet projects. Here are some helpful tips for making the crochet magic knot: There are. Web tips for making magic knots in crochet. When joining in new yarn or changing color, continue in the working yarn until two loops of the last stitch remain in the working yarn or color. Place the two ends of yarn one above the other as shown in the figure below and fold the yarn on the top (green in. Place the two ends of yarn one above the other as shown in the figure below and fold the yarn on the top (green in the picture) over the other (pink). Patterns may have different instructions, so you will want to make sure you understand how the pattern wants you to join. I had about 8″ here, give or take.. Web how to join yarn in crochet photo credit: Web this is the easiest, quickest way to join yarn in crochet. Making larger projects like sweaters and blankets will sure require you to join new yarn into your crochet project. Put a slip knot on the larger hook, and join yarn to the side of the top vertically to the. Showing how to join yarns using double crochets but works. If you have any requests for these, leave them in the. Learn this great way to join yarn in knitting or crochet. When making a magic knot, you want the two threads of yarn to be similar weight, thickness, and fibre content. Crochet projects often require joining yarns together. If you have any requests for these, leave them in the. You'll create the squares in tapestry crochet, then join them together to create a sturdy bag. Joining a new ball or skein of yarn correctly is as important to the appearan articles. Patterns may have different instructions, so you will want to make sure you understand how the pattern. Crochet projects often require joining yarns together. When making a magic knot, you want the two threads of yarn to be similar weight, thickness, and fibre content. Easy ways to connect a new skein of yarn to your project. Next, take your new yarn and join it alongside your yarn. But how do you transition from one skein to another? Web i’m going to share a couple ways to join yarn in crochet when working on a big project like a blanket, scarf or sweater. So, what, exactly, does this mean? Learn this great way to join yarn in knitting or crochet. The knot join is the simplest method but may leave an unattractive bump on the work. Joining at the end of a row Place the 2 tails going against each other. Digging through my youtube channel can get a little tricky to find what you are looking for, so i created a tab at the top of the blog called “crochet basics” and as i complete new short videos for this library, i will add the content there and as a blog post. Web with just your hook, some yarn, and one of these halloween crochet ideas, you can transform your home, your wardrobe, and create fun gifts! Web crochet how to join yarn. Web how to join yarn in crochet photo credit: Crochet projects frequently involve the need to join yarns together. Web this is the easiest, quickest way to join yarn in crochet. Whether you are adding a new color or changing to a new skein of yarn, it is important to know how to join yarn in crochet. Knot join, russian join, magic knot, and double crochet join. Here are some helpful tips for making the crochet magic knot: The pattern page provides detailed photo instructions for.
How to join two yarns together in crochet YouTube

How To Join with a Single Crochet Stitch • Oombawka Design Crochet

5 quick and easy ways to join new yarn in crochet Joining yarn
Top 20+ How To Connect Yarn When Crocheting

How to Join Yarn in Crochet 4 Ways Crochet stitches guide, Magic
Quick way to join new yarn in crochet YouTube

How to Join Yarn in Crochet 4 Ways Beginning crochet, Magic knot

How To Join In Yarn Crochet Amanda Gregory's Coloring Pages

How to Join Yarn with the Magic Knot • Free Tutorial by

How To Join New Yarn with a Slip Stitch • Oombawka Design Crochet
Red Heart Design Team June 4, 2023.
No Need To Use A Needle To Weave In Yarn Ends.
Showing How To Join Yarns Using Double Crochets But Works.
Crochet Projects Often Require Joining Yarns Together.
Related Post: